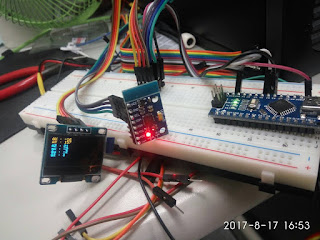
Integrate mpu6050 and OLED
ref http://www.takobear.tw/2014/01/25/bear-arduinompu6050servo/
// I2C device class (I2Cdev) demonstration Arduino sketch for MPU6050 class

// 10/7/2011 by Jeff Rowberg <jeff@rowberg.net>

// Updates should (hopefully) always be available at https://github.com/jrowberg/i2cdevlib

//

// Changelog:

//      2013-05-08 - added multiple output formats

//                 - added seamless Fastwire support

//      2011-10-07 - initial release


// I2Cdev and MPU6050 must be installed as libraries, or else the .cpp/.h files

// for both classes must be in the include path of your project

#include "I2Cdev.h"

#include "MPU6050.h"

#include <Adafruit_GFX.h>

#include <Adafruit_SSD1306.h>


#define OLED_RESET 4

Adafruit_SSD1306 display(OLED_RESET);


#define NUMFLAKES 10

#define XPOS 0

#define YPOS 1

#define DELTAY 2


// Arduino Wire library is required if I2Cdev I2CDEV_ARDUINO_WIRE implementation

// is used in I2Cdev.h

#if I2CDEV_IMPLEMENTATION == I2CDEV_ARDUINO_WIRE

    #include "Wire.h"

#endif


// class default I2C address is 0x68

// specific I2C addresses may be passed as a parameter here

// AD0 low = 0x68 (default for InvenSense evaluation board)

// AD0 high = 0x69

MPU6050 accelgyro;

//MPU6050 accelgyro(0x69); // <-- use for AD0 high


int16_t ax, ay, az;

int16_t gx, gy, gz;


// uncomment "OUTPUT_READABLE_ACCELGYRO" if you want to see a tab-separated

// list of the accel X/Y/Z and then gyro X/Y/Z values in decimal. Easy to read,

// not so easy to parse, and slow(er) over UART.

#define OUTPUT_READABLE_ACCELGYRO


// uncomment "OUTPUT_BINARY_ACCELGYRO" to send all 6 axes of data as 16-bit

// binary, one right after the other. This is very fast (as fast as possible

// without compression or data loss), and easy to parse, but impossible to read

// for a human.

//#define OUTPUT_BINARY_ACCELGYRO


#define LED_PIN 13

bool blinkState = false;


void setup() {

    // join I2C bus (I2Cdev library doesn't do this automatically)

    #if I2CDEV_IMPLEMENTATION == I2CDEV_ARDUINO_WIRE

        Wire.begin();

    #elif I2CDEV_IMPLEMENTATION == I2CDEV_BUILTIN_FASTWIRE

        Fastwire::setup(400, true);

    #endif


    // initialize serial communication

    // (38400 chosen because it works as well at 8MHz as it does at 16MHz, but

    // it's really up to you depending on your project)

    Serial.begin(38400);


    // initialize device

    Serial.println("Initializing I2C devices...");

    accelgyro.initialize();


    // verify connection

    Serial.println("Testing device connections...");

    Serial.println(accelgyro.testConnection() ? "MPU6050 connection successful" : "MPU6050 connection failed");


    // use the code below to change accel/gyro offset values


    // configure Arduino LED for

    pinMode(LED_PIN, OUTPUT);


     // by default, we'll generate the high voltage from the 3.3v line internally! (neat!)

  display.begin(SSD1306_SWITCHCAPVCC, 0x3C);  // initialize with the I2C addr 0x3D (for the 128x64)

  // init done


  // Show image buffer on the display hardware.

  // Since the buffer is intialized with an Adafruit splashscreen

  // internally, this will display the splashscreen.

  display.display();

  delay(200);


  // Clear the buffer.

  display.clearDisplay();

      display.setTextSize(2);

  display.setTextColor(WHITE);

}


int rate = 200;

void loop() {

    // read raw accel/gyro measurements from device

    accelgyro.getMotion6(&ax, &ay, &az, &gx, &gy, &gz);


    // these methods (and a few others) are also available

    //accelgyro.getAcceleration(&ax, &ay, &az);

    //accelgyro.getRotation(&gx, &gy, &gz);


    #ifdef OUTPUT_READABLE_ACCELGYRO


  display.setCursor(0,0);

  display.println("A");

  display.print("X:");

  display.println(ax/rate);

  display.print("Y:");

  display.println(ay/rate);

  display.print("Z:");

  display.println(az/rate);


  display.setCursor(64,0);


  display.println("G");

  display.setCursor(64,16);

  display.print("x:");

  display.println(gx/rate);

  display.setCursor(64,32);

  display.print("y:");

  display.println(gy/rate);

  display.setCursor(64,48);

  display.print("z:");

  display.println(gz/rate);

    display.display();

  display.clearDisplay();

    #endif

}


留言
張貼留言