OpenSSH
net stop sshd
net start sshd
\programdata\ssh 即可進入下面的資料來. 並找到sshd_config
from https://github.com/PowerShell/Win32-OpenSSH/wiki/Install-Win32-OpenSSH
Install Win32 OpenSSH
Install Win32 OpenSSH (test release)
Win32-OpenSSH Github releases can be installed on Windows 7 and up.
Note these considerations and project scope first.
Download the latest build of OpenSSH. To get links to latest downloads this wiki page.
Extract contents of the latest build to
C:\Program Files\OpenSSH(Make sure binary location has the Write permissions to just to SYSTEM, Administrator groups. Authenticated users should and only have Read and Execute.)In an elevated Powershell console, run the following
powershell.exe -ExecutionPolicy Bypass -File install-sshd.ps1
Open the firewall for sshd.exe to allow inbound SSH connections
New-NetFirewallRule -Name sshd -DisplayName 'OpenSSH Server (sshd)' -Enabled True -Direction Inbound -Protocol TCP -Action Allow -LocalPort 22
Note:
New-NetFirewallRuleis for Windows 2012 and above servers only. If you're on a client desktop machine (like Windows 10) or Windows 2008 R2 and below, try:netsh advfirewall firewall add rule name=sshd dir=in action=allow protocol=TCP localport=22Start
sshd(this will automatically generate host keys under %programdata%\ssh if they don't already exist)net start sshd
Optional
Uninstall Win32 OpenSSH
- Start Windows Powershell as Administrator
- Navigate to the OpenSSH directory
cd 'C:\Program Files\OpenSSH'
- Run the uninstall script
powershell.exe -ExecutionPolicy Bypass -File uninstall-sshd.ps1
from https://t-dilemma.info/windows-openssh-limit-groups/
Windows Server 2019のOpenSSHへの接続を制限してみる
どうも、Tです。
先日、Windwos Server 2019にOpenSSHをインストールしましたが、何も設定しないとローカルユーザーでもドメインユーザーにも権限に関係なくSSHもSFTPも接続できる状態です。
やりたいこと
- ローカル・ドメイングループからのSSH接続制限
- SSH接続不可、SFTP接続のCHROOT化
まずグループ単位でSSH接続を制限できるか確認します。また、SFTPだけ使う環境を想定して、SSH接続をできなくしてSFTP接続(WinSCPなどのクライアントソフトからの接続)のみを許可、かつ公開したフォルダ配下した触れないようにCHROOT化を行います。
可能であれば、ドメインユーザー単位で制御したいなぁと思っておりました。下記のような記載もあったためドメインユーザー単位の制御も可能と考えてましたが、どうしてもドメインユーザー単位の制御ができなかったので諦めめてグループ単位の制御に変更しました。
※ローカルユーザー単位の制御は行えました。


ドメイン ユーザーまたはグループを使用してユーザー/グループ ベースの規則を構成する場合は、
user?domain*の形式を使用します。 Windows では、ドメイン プリンシパルを指定するために複数の形式を使用できますが、標準の Linux パターンと競合するものが多数あります。 そのため、FQDN をカバーするために * が追加されています。 また、この方法では、@ の代わりに “?” を使用して、username@host 形式との競合を回避しています。
環境
- OpenSSHインストール:Windows Server 2019
- ADドメインのコントローラ:Windows Server 2019
SSHのコンフィグファイルが上書き禁止になってしまうため、作業はローカルAdministratotrもしくはドメインのAdministratorで行います。今回は、ドメインのAdministratorを使っています。
事前確認
SSH設定ファイルの場所
既定のSSH設定ファイルは、「%programdata%\ssh\sshd_config」になります。今回もこれを使います。

SSH設定ファイルの追記箇所
sshd_configは、テキストファイルで編集しますが、末尾にMatch構文が入っていました。Match構文のブロックは、宣言から最終行までをMatch構文として扱ってしまうため想定外の動作を極力なくすため、Mach構文の前に追加した設定を書いていきます。
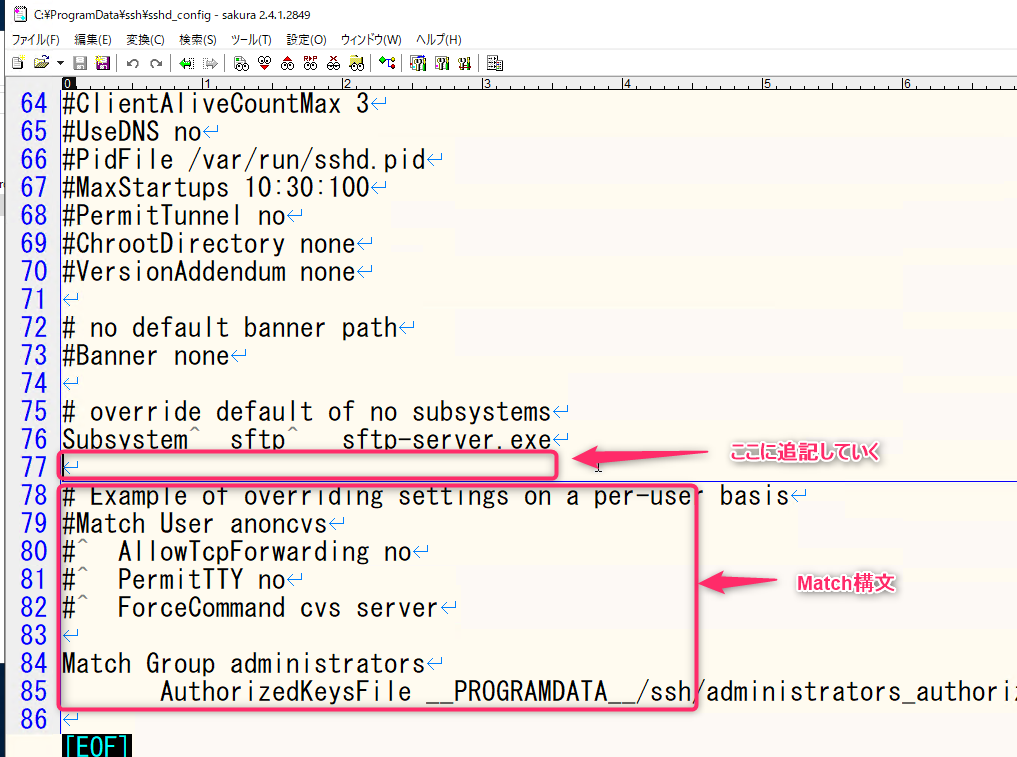
Matchブロックは、Match Allで終わる


Match Allを入れるとMatch構文を終わらせることもできますが、Windows版のOpenSSHということもあり、個人的にどこまで正確に働くか不安があるため極力既存の設定項目をいじらないようにしました。
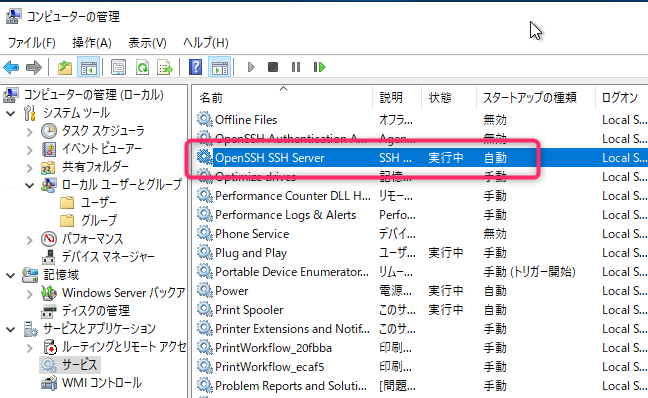
sshd_configを編集・保存したとは、設定を反映させるためOpenSSH SSH Serverサービスを手動で再起動します。
ローカルとドメイングループからのSSH制限
事前準備
テストで使うグループとユーザーを作成します。
ドメイングループ・ユーザー作成
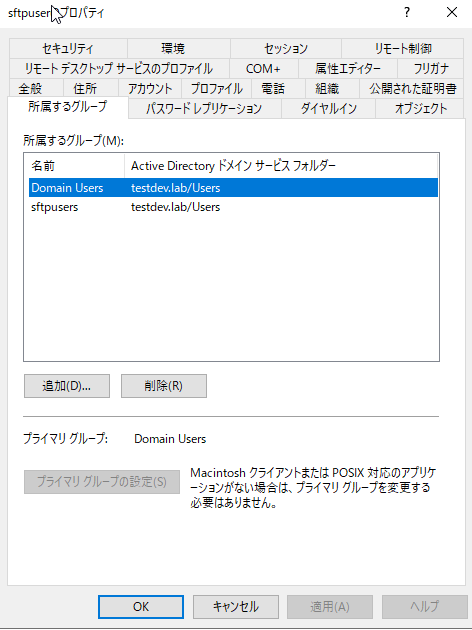
下記のドメイングループとユーザーを作成しました。
- ドメイングループ:sftpusers
- ドメインユーザー:sftpuser
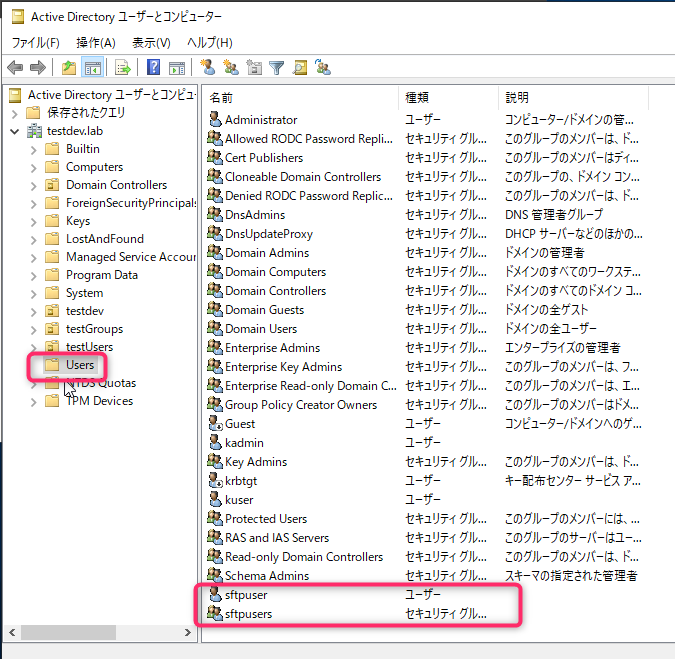
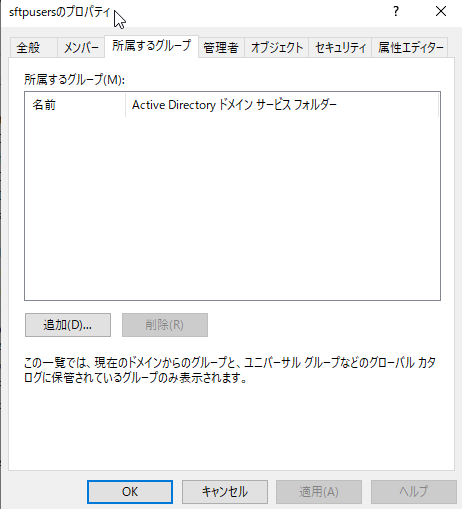
ドメイングループには、他に所属しているグループはありません。
ドメインユーザーは、デフォルトのDomain Usersグループと作成したグループのみに所属している状態です。
ローカルグループ・ユーザー作成
下記のローカルグループとユーザーを作成しました。これは、OpenSSHサーバーをインストールしたOS上のローカルグループとユーザーになります。
- ローカルグループ:localsftpusers
- ローカルユーザー:localsftpuser
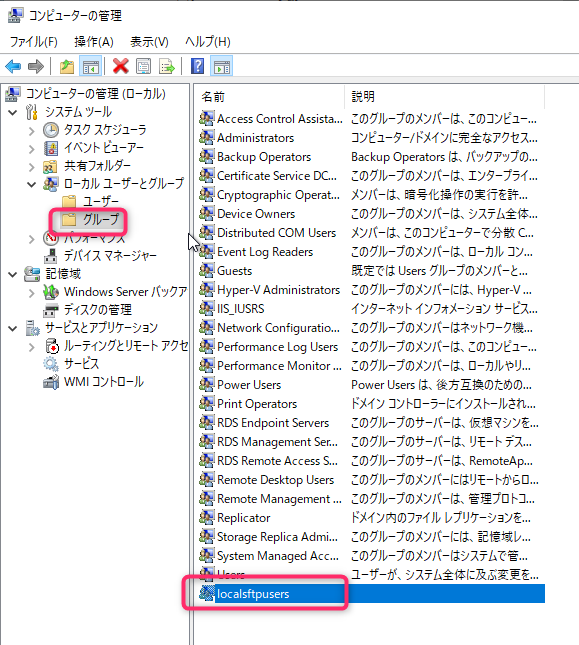
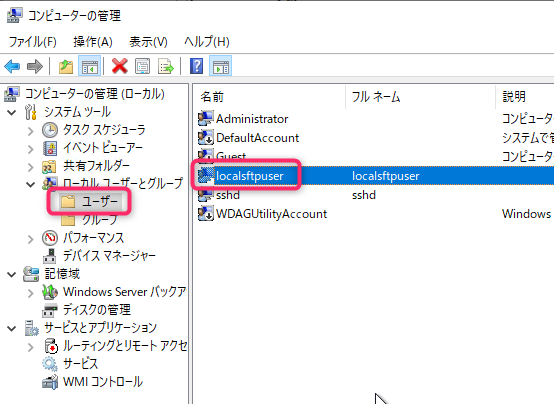
ローカルユーザーは、デフォルトのUsersグループと作成したローカルグループのみに所属しています。

設定
sshd_configに下記の設定を追記して、サービスを再起動します。これで、指定したグループに所属するユーザーからのみSSH接続を許可した意味になります。Denyの指定をしなくともAllowした以外のグループは拒否されます。
- ドメイングループの場合:<ドメイン名>\<ドメイングループ名>
- ローカルグループの場合:<ローカルグループ名>

ダブルウォーテーションの必要性
設定値にダブルクォーテーションは必須ではありません。下記のようにグループ名に空白がある場合は、ダブルクォーテーションで囲う必要があります。
AllowGroups “testdev.lab\Domain Admins”
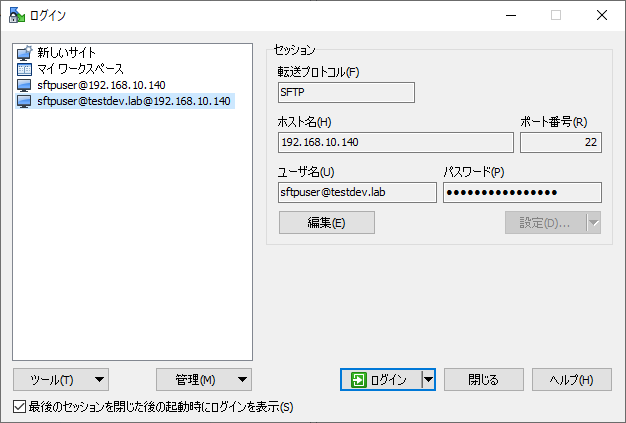
作成したドメイングループに所属するユーザーでSSH接続すると正常に接続できます。

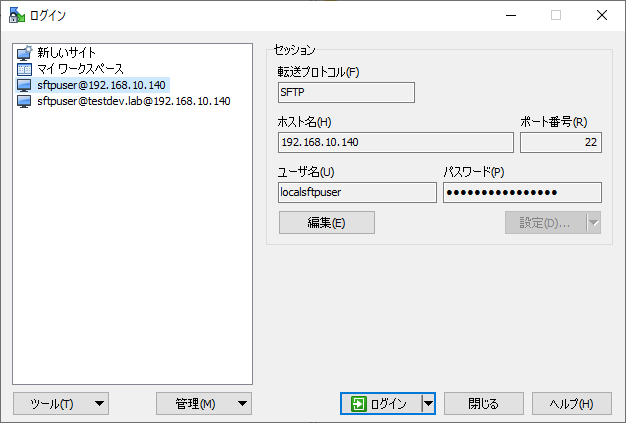
作成したローカルグループに所属するユーザーでSSH接続すると正常に接続できます。

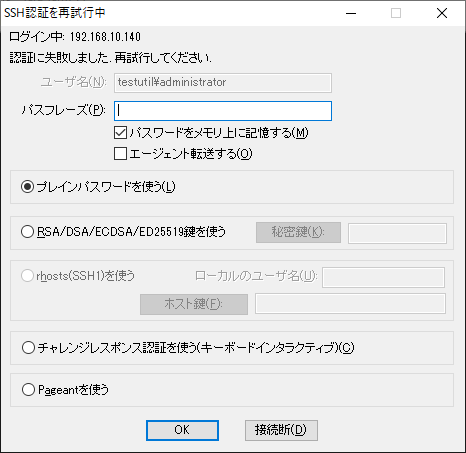
管理者権限を持っていても、Allowしたグループ以外のユーザーはSSH接続をすることはできません。再度パスワードを聞かれるようになります。

ユーザーとグループの両方のAllow設定
AllowUsersとAllowGroupsがある場合、AllowUsersが先に処理されAlloGroupsは無視されます(Linuxでも同様です)。そのため、制限をかける場合は、AllowUsersを使うのかAllowGroupsを使うのか先に決めておきましょう。個人的には、後々ユーザーを追加してもSSH設定変更が必要のないAllowGroupsが運用上も楽かと考えています。
allow/deny ディレクティブは、次の順序で処理されます。DenyUsers、AllowUsers、DenyGroups、最後に AllowGroups。
SSH接続不可、SFTP接続のCHROOT化
事前準備
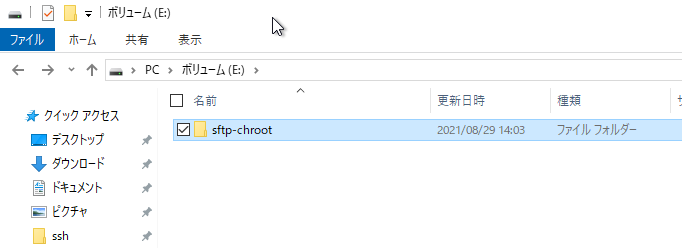
SFTP接続時のルートディレクトリとなるフォルダを作成します。
設定
SFTPの接続とCHROOTの設定を行います。ざっくりですが、マイクロソフトのマニュアルにも記載があります。
ChrootDirectory (v7.7.0.0 に追加されたサポート)
このディレクティブは、sftp セッションでのみサポートされます。 cmd.exe へのリモート セッションでは、このようなことはできません。 sftp 専用の chroot サーバーをセットアップするには、ForceCommand を internal-sftp に設定します。 scp と sftp だけを許可するカスタム シェルを実装することで、chroot を使用する scp をセットアップすることもできます。
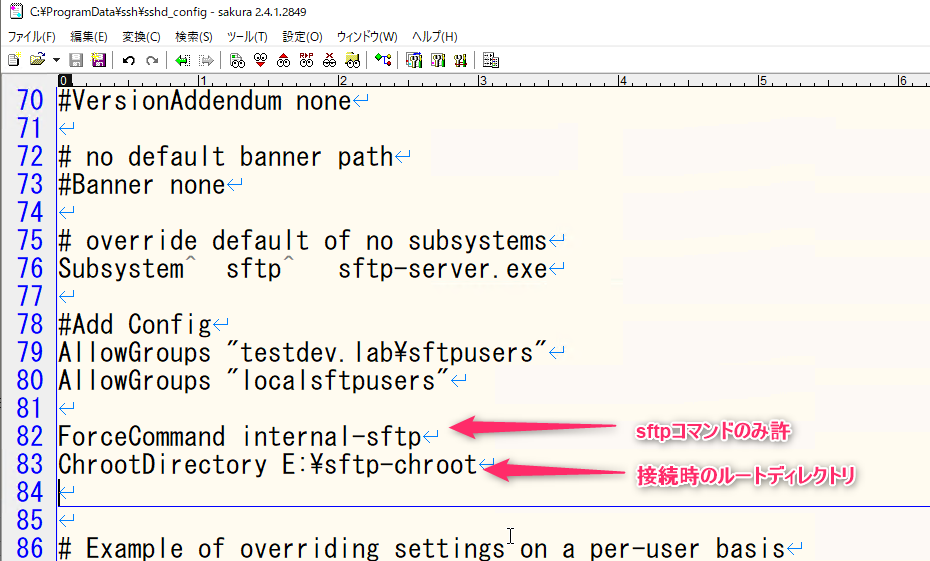
sshd_configに下記の設定を追記して、サービスを再起動します。
- ForceCommand internal-sftp
- ChrootDirectory <接続時のルートディレクトリのパス>
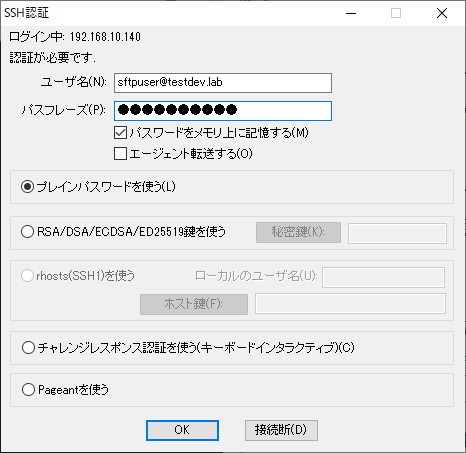
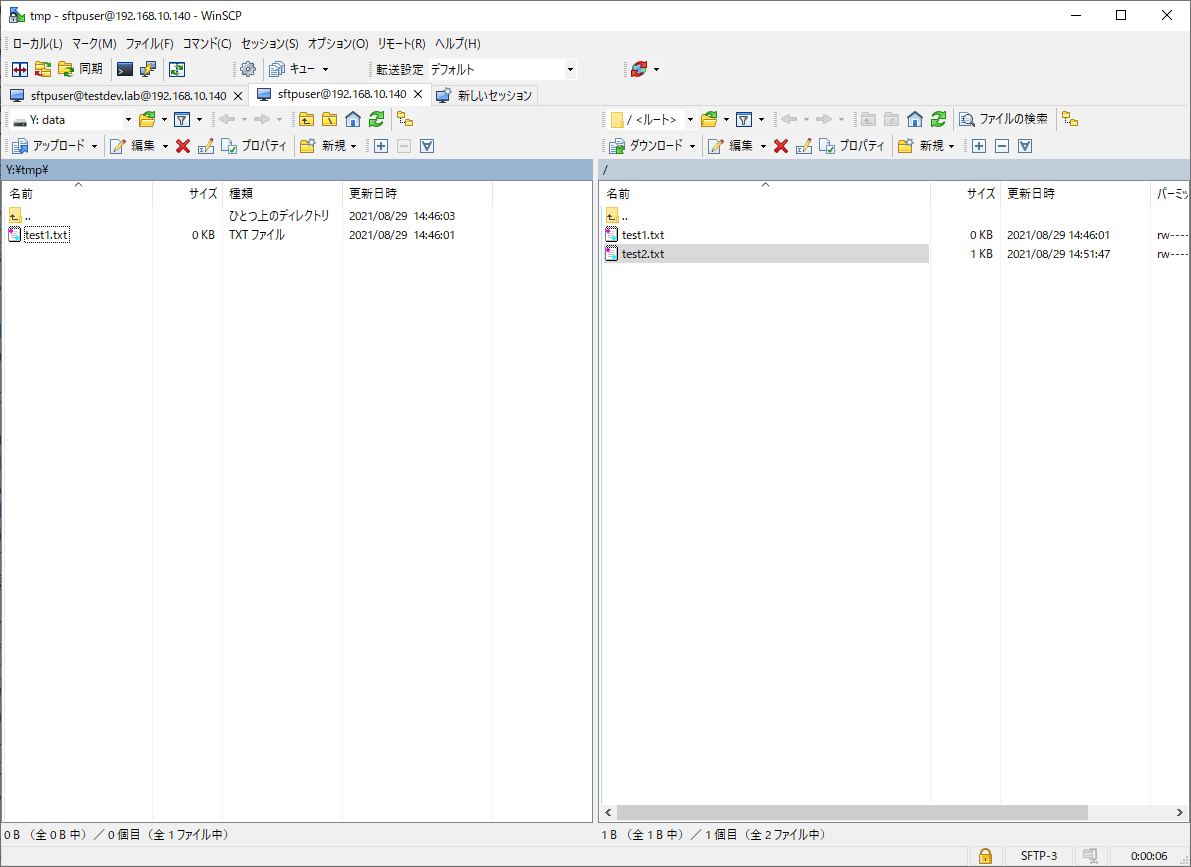
ドメインユーザーで接続します。
接続できました。ルートディレクトリ(ChrootDirectoryで指定したディレクトリ)以外は表示されません。ファイルコピーが行えました。

SFTP側でファイルを新規作成することもできます。
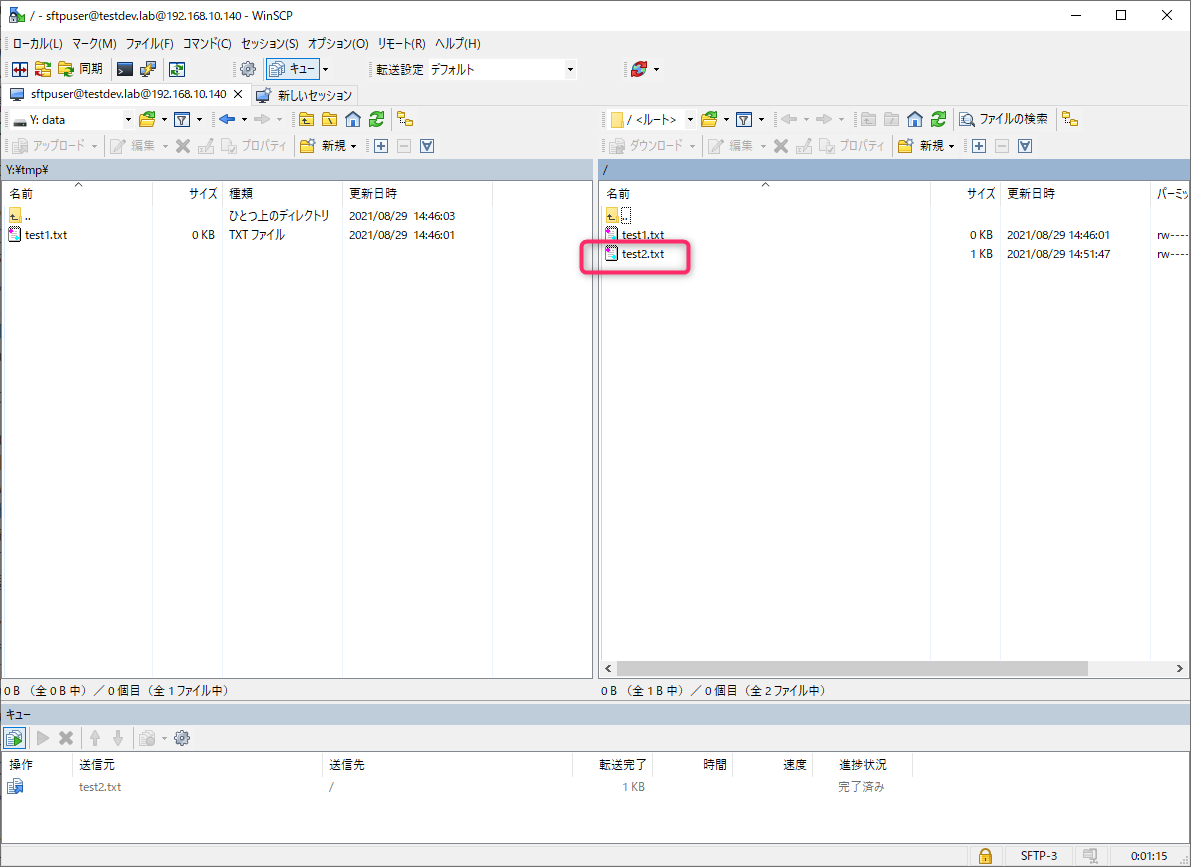
サーバー側とみるとCHROOTのディレクトリに作成されていることがわかります。
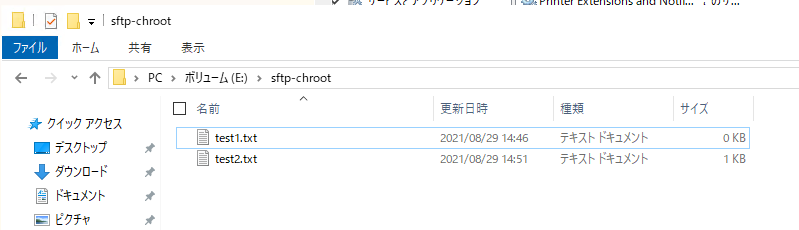
ローカルユーザーで接続しても同様です。
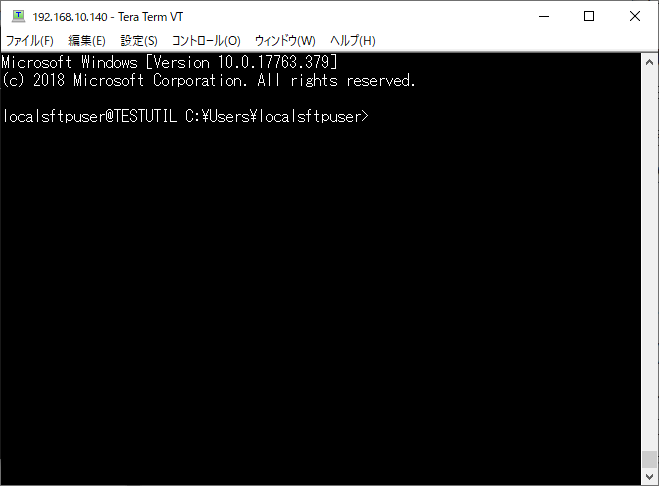
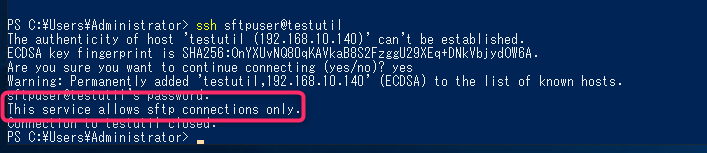
この状態でTeratermなどでSSH接続を行うと、認証は通りますがアプリのウインドウが即時閉じられます。
コマンドラインからアクセスすると「This service allows sftp connections only.」とSFTPのみ許可されるメッセージが表示され接続できません。
なぜデフォルトのドメインユーザーで書き込みできるのか
CHROOTのフォルダにデフォルトの権限しかないドメインユーザーで書き込みできる理由を念のため・・・・。
下記は、SSHサーバーに作成したテスト用のドメインユーザーでログインした状態ですが、ログインを行うとBUILTIN\Usersグループが割り当たります。
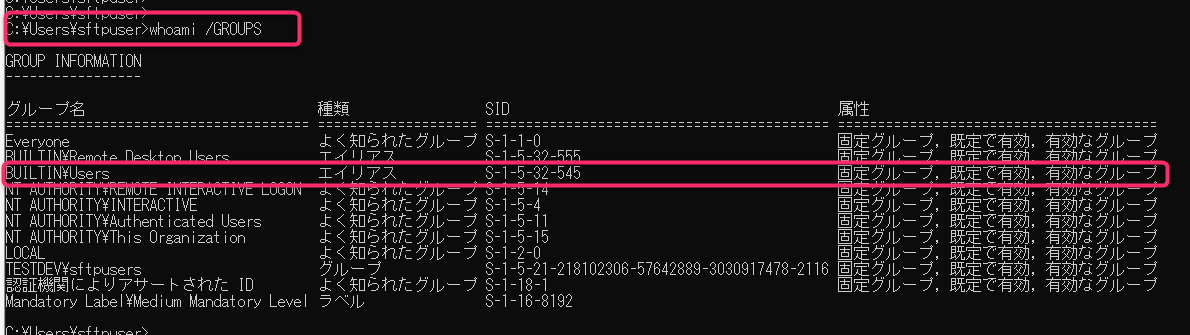
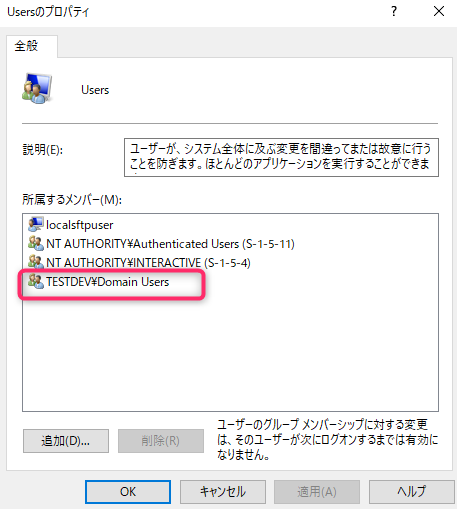
これはローカルのUsersグループに、Domain Usersに所属しているためになります。
先ほどのCHROOTように作ったフォルダのNTFSアクセス権を確認してみます。
プリンシパルにBUILTIN\Usersが特殊で割り振られています。
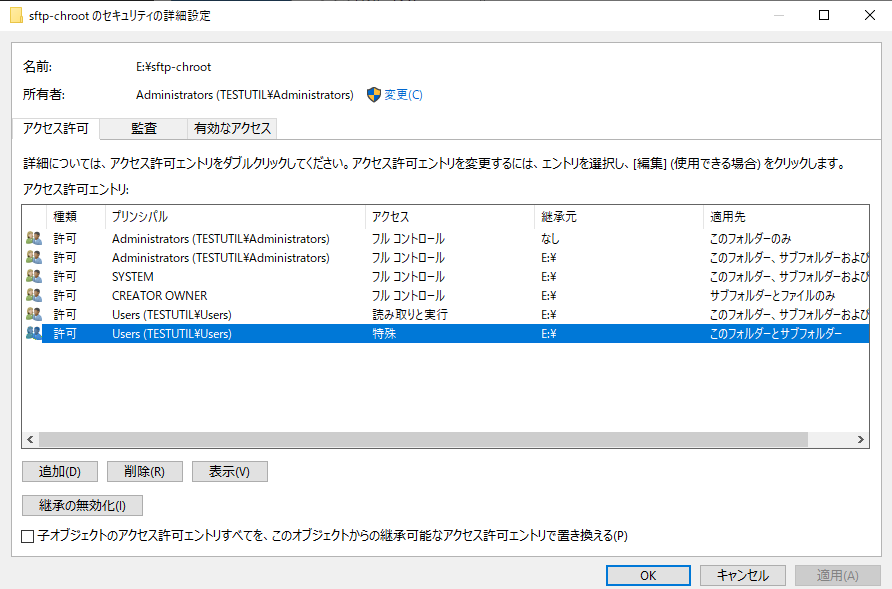
特殊の中を見るとこのフォルダとサブフォルダに対しては、ファイル・フォルダの作成の権限が付きます。また、削除は与えられていませんが、前述の画面でデフォルトCREATOR OWNERはフルコントロールが付いているので削除、変更なども問題なくできます。

この辺りは、Windowsを使っている通常の動作と変わりないようなので、フォルダ・ファイル操作を厳密に制御した場合は、フォルダやファイルに対してNTFSアクセス権を細かく指定していけば問題なくできそうですね。
参考


まとめ
この辺り、あまり記載しているサイトがなかった・・・・まぁSFTPとか必要ならLinuxで作っちゃうか・・・・。
でも、個人的にLinuxない環境というのも多いので、Windows2019でSFTPが使えるようになったのは大きな意味があるなと感じます。
from https://liangdaddy.com/2021/05/02/windows-server-%E6%9E%B6-sftp-%E6%95%99%E5%AD%B8/
一. 安裝windows內建 open ssh server
- 先到設定裡, 選下圖中的 apps

2.再選 Manage optional features

3. 選 add a feature

4. 下拉選下圖中的 OpenSSH server, 然後就會自動安裝完成

5.以上安裝完成後, 再到 Service 裡把 OpenSSH Server 手動改成自動啟動 。 並啟動。
6.檢查firewall裡是否有開啟 port 22 income規則。
以上就大致完成安裝SFTP, 此時用windows 使用者帳號用filezilla透過SFTP登入成功的話,
是可以瀏覽C:\ 下所有的資料, 相當的危險, 所以要再做以下第二步驟。
二. 設定SFTP的權限及目錄 , 預設資料夾\
1.在 檔案總管 上方直接輸入 \programdata\ssh 即可進入下面的資料來. 並找到 sshd_config的檔案.
用 記事本打開它.

2. 打開檔案後, 找空白的地方如下圖, 輸入紅色的三行
Match User 你的使用者帳號名稱
ForceCommand internal-sftp
Match User username
ChrootDirectory C:\somefolder

以上只要把帳號密碼及IP位置給廠商, 對方就可以透過SFTP上傳資料了.
from https://winscp.net/eng/docs/guide_windows_openssh_server#windows_older
Installing SFTP/SSH Server on Windows using OpenSSH
Recently, Microsoft has released a port of OpenSSH for Windows. You can use the package to set up an SFTP/SSH server on Windows.
- Installing SFTP/SSH Server
- Configuring SSH server
- Setting up SSH public key authentication
- Connecting to the server
- Further reading
Installing SFTP/SSH Server
On Windows 10 version 1803 and newer
- In Settings app, go to Apps > Apps & features > Manage optional features.
- Locate “OpenSSH server” feature, expand it, and select Install.
Binaries are installed to %WINDIR%\System32\OpenSSH. Configuration file (sshd_config) and host keys are installed to %ProgramData%\ssh (only after the server is started for the first time).
You may still want to use the following manual installation if you want to install a newer version of OpenSSH than the one built into Windows 10.
On earlier versions of Windows
- Download the latest OpenSSH for Windows binaries (package
OpenSSH-Win64.ziporOpenSSH-Win32.zip) - As the Administrator, extract the package to
C:\Program Files\OpenSSH - As the Administrator, install sshd and ssh-agent services:
powershell.exe -ExecutionPolicy Bypass -File install-sshd.ps1
Configuring SSH server
- Allow incoming connections to SSH server in Windows Firewall:
- When installed as an optional feature, the firewall rule “OpenSSH SSH Server (sshd)” should have been created automatically. If not, proceed to create and enable the rule as follows.
- Either run the following PowerShell command as the Administrator:
New-NetFirewallRule -Name sshd -DisplayName 'OpenSSH SSH Server' -Enabled True -Direction Inbound -Protocol TCP -Action Allow -LocalPort 22 -Program "C:\System32\OpenSSH\sshd.exe"
ReplaceC:\System32\OpenSSH\sshd.exewith the actual path to thesshd.exe(C:\Program Files\OpenSSH\ssh.exe, had you followed the manual installation instructions above). - or go to Control Panel > System and Security > Windows Defender Firewall1 > Advanced Settings > Inbound Rules and add a new rule for port 22.
- Start the service and/or configure automatic start:
- Go to Control Panel > System and Security > Administrative Tools and open Services. Locate OpenSSH SSH Server service.
- If you want the server to start automatically when your machine is started: Go to Action > Properties. In the Properties dialog, change Startup type to Automatic and confirm.
- Start the OpenSSH SSH Server service by clicking the Start the service.
These instructions are partially based on the official deployment instructions.
Setting up SSH public key authentication
Follow a generic guide for Setting up SSH public key authentication in *nix OpenSSH server, with the following difference:
- Create the
.sshfolder (for theauthorized_keysfile) in your Windows account profile folder (typically inC:\Users\username\.ssh).2 - For permissions to the
.sshfolder and theauthorized_keysfile, what matters are Windows ACL permissions, not simple *nix permissions. Set the ACL so that the respective Windows account is the owner of the folder and the file and is the only account that has a write access to them. The account that runs OpenSSH SSH Server service (typicallySYSTEMorsshd) needs to have read access to the file. - Though, with the default Win32-OpenSSH configuration there is an exception set in
sshd_configfor accounts inAdministratorsgroup. For these, the server uses a different location for the authorized keys file:%ALLUSERSPROFILE%\ssh\administrators_authorized_keys(i.e. typicallyC:\ProgramData\ssh\administrators_authorized_keys).
Connecting to the server
Finding Host Key
Before the first connection, find out the fingerprint of the server’s host key by using ssh-keygen.exe for each file.
In Windows command-prompt, use:
for %f in (%ProgramData%\ssh\ssh_host_*_key) do @%WINDIR%\System32\OpenSSH\ssh-keygen.exe -l -f "%f"
Replace %WINDIR%\System32 with %ProgramFiles%, if appropriate.
In PowerShell, use:
Get-ChildItem $env:ProgramData\ssh\ssh_host_*_key | ForEach-Object { . $env:WINDIR\System32\OpenSSH\ssh-keygen.exe -l -f $_ }
Replace $env:WINDIR\System32 with $env:ProgramFiles, if appropriate.
You will get an output like this:
C:\Windows\System32\OpenSSH>for %f in (%ProgramData%\ssh\ssh_host_*_key) do @%WINDIR%\System32\OpenSSH\ssh-keygen.exe -l -f "%f"
1024 SHA256:K1kYcE7GHAqHLNPBaGVLOYBQif04VLOQN9kDbiLW/eE martin@example (DSA)
256 SHA256:7pFXY/Ad3itb6+fLlNwU3zc6X6o/ZmV3/mfyRnE46xg martin@example (ECDSA)
256 SHA256:KFi18tCRGsQmxMPioKvg0flaFI9aI/ebXfIDIOgIVGU martin@example (ED25519)
2048 SHA256:z6YYzqGiAb1FN55jOf/f4fqR1IJvpXlKxaZXRtP2mX8 martin@example (RSA)
Connecting
Start WinSCP. Login dialog will appear. On the dialog:
- Make sure New site node is selected.
- On New site node, make sure the SFTP protocol is selected.
- Enter your machine/server IP address (or a hostname) into the Host name box.
- Enter your Windows account name to the User name box. It might have to be entered in the format
user@domainif running on a domain. - For a public key authentication:
- Press the Advanced button to open Advanced site settings dialog and go to SSH > Authentication page.
- In Private key file box select your private key file.
- Submit Advanced site settings dialog with the OK button.
- For a password authentication:
- Enter your Windows account password to the Password box.
- If your Windows account does not have a password, you cannot authenticate with the password authentication (i.e. with an empty password), you need to use the public key authentication.
- Save your site settings using the Save button.
- Login using Login button.
- Verify the host key by comparing fingerprints with those collected before (see above).
from http://fygul.blogspot.com/2020/11/windows-openssh-server.html
Windows機器安裝與設置OpenSSH Server
概要
Linux與Windows機器之間的資料連線若不想再使用SAMBA,改用SSH的方式會更單純,而且設置也相較簡單許多。本文記錄Windows機器安裝與簡易設置自由與開源軟體OpenSSH Server的方法。
Windows安裝與設置OpenSSH Server
以下的手工安裝方式適用於Windows 10之前的Windows版本;也可適用於Windows 10近兩年來的版本,在這些較新的Windows版本上,有其他看來較簡便的安裝方式[1],而此法則可用在安裝比系統提供的還新版本的OpenSSH Server。
安裝OpenSSH Server
- 自行下載最新版的二進制包裝檔(OpenSSH-Win64.zip或OpenSSH-Win32.zip)
- 以管理員權限把上述壓縮檔解開放進 C:\Program Files\OpenSSH
以管理員權限,開個命令行視窗,進入上述目錄,安裝sshd與ssh-agent服務:
powershell powershell.exe -ExecutionPolicy Bypass -File install-sshd.ps1

完成後會以系統服務的方式來執行sshd。而設置檔 sshd_config 與 host keys 在sshd服務第一次啟動時會安裝到 %ProgramData%\ssh 。
移除OpenSSH Server
以管理員權限,開個命令行視窗,進入上述目錄,執行其中的反安裝腳本:
powershell.exe -ExecutionPolicy Bypass -File uninstall-sshd.ps1
設置OpenSSH Server
- sshd會從 %programdata%\ssh\sshd_config 讀取設置資料,如果該檔不存在,sshd會在服務啟動時以預設設置來產生它。此設置檔案是純文字檔,可視需要自行修改必要的選項,像通訊埠Port。較詳細的說明可見參考[3]。
- sshd是以服務的方式執行,預設是以手動來啟動,若要自動啟動,進入系統管理工具,在服務項目中找到 OpenSSH SSH Server,改成自動啟動。
- 記得調整防火牆放行sshd或是服務的通訊埠,讓ssh client能連線進入。依所用的防火牆軟體,有不同方式,如下圖:

限制
移植到Windows上的OpenSSH因某些因素缺了部分功能[4]而有些限制。不過對於一般的簡易用途而言,還不致於有太大影響。
結語
以上只是在Windows上OpenSSH的簡單安裝與設置方式,可適用於內部網路與Unix機器進行資料傳輸,以取代以往傳統上使用SAMBA的方式,不僅更方便,安全性也較好。機器如果要放在公眾網路上,最好對OpenSSH Server做較嚴謹的設置,像是儘量別用預設的22埠、限制可連線的帳號/群組,以減少被有心人士有機可趁的機會。
參考與連結
from https://blog.csdn.net/hefengjiao123/article/details/84584223
在网上看到得windows 安装得openssh教程,下载解压缩之后,在解压缩得目录下运行
1、powershell.exe -ExecutionPolicy Bypass -File install-sshd.ps1
2、netsh advfirewall firewall add rule name=sshd dir=in action=allow protocol=TCP localport=22
启动sshd服务
3、net start sshd
————————————————
版权声明:本文为CSDN博主「hefengjiao123」的原创文章,遵循CC 4.0 BY-SA版权协议,转载请附上原文出处链接及本声明。
原文链接:https://blog.csdn.net/hefengjiao123/article/details/84584223
from https://wave.hatenablog.com/entry/2019/02/23/080800
Windows10でOpenSSHサーバーを動かす
現在のWindows10では、外部からバイナリを探してダウンロードしなくても、公式にOpenSSHサーバーを動作させることができるようになっています。
実際に試してみたので、その手順を紹介します。
OpenSSHサーバーの導入
Windows10の標準状態ではOpenSSHサーバー機能は導入されていません。オプション機能に含まれていますので、[システム設定] - [オプション機能の管理] - [機能の追加] から [OpenSSH サーバー]を選択し、[インストール]を押下します。
なお、[インストール]を押して機能を追加した後、直ちにOpenSSHサーバーが自動起動するわけではありません。要するにインストールしただけであれば、明示的に開始しなければ起動しません。どんな初期設定になっているのか判らないサーバー機能が自動起動するのはセキュリティ的に怖いですが、そうではありませんのでご安心を。
OpenSSHサーバーの設定
Linux環境等でOpenSSHを運用したことがある人ならば、設定ファイルであるsshd_configに設定を記述すればよいことは察しが付くと思います。そのパスがどこかさえ判れば、基本的な設定内容はLinuxと同様です*1。
Windows版のOpenSSH絡みのパスを整理しておくと、標準では以下のようになっています。
| - | Path |
|---|---|
| Executable binary | %WINDIR%\System32\OpenSSH 例. C:\Windows\System32\OpenSSH |
| sshd_config | %PROGRAMDATA%\ssh\sshd_config 例. C:\ProgramData\ssh\sshd_config |
| authorized_keys | %USERPROFILE%\.ssh\authorized_keys 例. C:\Users\USERNAME\.ssh\authorized_keys |
※sshd_configはsshd.exeの起動パラメータに-fオプションで指定することで任意ファイルを指定可能
OpenSSHサーバーをインストールした後、%PROGRAMDATA%\ssh\sshd_configはほとんどコメントアウトされた状態で存在しています。
必要に応じてコメントアウトを外したり設定値を変更して下さい。コマンドプロンプトから作業するなら以下のようなコマンドを叩くことになるでしょう。
例えば、パスワード認証を許可せず公開鍵認証のみを有効にして、Administratorsグループに属するユーザーでも%USERPROFILE%\.ssh\authorized_keysを見てほしいという設定をすると以下のような差分が確認できるはずです。
Windows Firewallの設定
OpenSSHサーバーをインストールすると、sshdがTCP22番ポートを待ち受けるための受信の規則が"OpenSSH SSH Server (sshd)"という名前で自動作成されていますので、何もしなくてもOpenSSHサーバーへの通信が可能な状態になっています。
が、ハードニングの観点から接続元ホストを絞りたいなど、ファイヤーウォールで何らかの制限をかけたいこともあるでしょう。ここでは、192.168.1.0/24のLAN内に設置されており、LAN内からの接続のみ許可するように設定する場合を例として示します。
[セキュリティが強化されたWindows Defender ファイヤーウォール]から"OpenSSH SSH Server (sshd)"という名前の受信の規則のプロパティを表示させ、[スコープ]タブを開きます。デフォルトでは以下のように、リモートIPアドレスが[任意のIPアドレス]になっているため、任意のマシンからアクセス可能になっています。")
ラジオボタンで[これらのIPアドレス]を指定すると以下のダイアログが開きます。ここでIPアドレスを指定すると、そのマシン以外からのアクセスを拒否できます(ホワイトリスト)。
LAN(192.168.1.0/24)内の全マシンを許可した場合、以下のような設定になります。")
OpenSSHサーバーの起動
OpenSSHサーバーもWindows的な表現ではサービスの一つです。ファイル名を指定して実行でservices.mscを起動すると、"OpenSSH SSH Server"というサービスが停止状態で存在しているはずです。このサービスのプロパティを確認すると、インストールしただけの状態では以下のようになっています。
このGUI上で[開始]を押せばsshdが起動しますし、開始後に[停止]を押せばsshdは終了します。スタートアップの種類を[手動]から[自動]に変更すれば、Windows起動時にsshdも自動起動するようになります。
CLIで起動/停止を制御したければ、以下のようにコマンドを叩けば実現できます。
OpenSSHサーバーのログ
WindowsなのでOpenSSHサーバーも標準ではイベントログに出力されます。ファイル名を指定して実行でEventVwrを実行するとイベントビューアーが開きますが、[アプリケーションとサービスログ] - [OpenSSH] - [Operational]を開くとsshd経由でのログイン周りのログなどが出力されていることを確認できます。
このイベントログのプロパティを確認するとデフォルトでは以下のようになっており、1028KBに達すると古いエントリからオーバーライトされます。管理上どうでもいい私用マシンなどならこのままでも問題ないかも知れませんが、業務運用するようなマシンではログのアーカイブ等の運用・管理も必要になるでしょう。


留言
張貼留言