Connect and Control WS2812 RGB LED Strips via Raspberry Pi
from https://tutorials-raspberrypi.com/connect-control-raspberry-pi-ws2812-rgb-led-strips/
from https://github.com/jgarff/rpi_ws281x
## Build python
cd /home/pi/rpi_ws281x/python
As this is just a python wrapper for the library you must first follow
the build instructions in the parent directory.
When complete, you can build this python wrapper:
```
sudo apt-get install python-dev swig
python ./setup.py build
``` ç½®
If you are rebuilding after fetching some updated commits, you might need toˆ—
remove the build directory first
```
rm -rf ./build
```
## Install
If you want to install the library (in a virtualenv or in the system), so that you can `import neopixel` from anywhere, you need to run:
```
sudo python ./setup.py install
```
Depending on where you are installing, root privileges may be needed (prepend `sudo` to the install command).
## Run a demo
```
sudo PYTHONPATH=".:build/lib.linux-armv7l-2.7" python examples/strandtest.py
```
If you installed the library, there is no need to specify `PYTHONPATH`:
```
sudo python examples/strandtest.py
C#
https://github.com/rpi-ws281x/rpi-ws281x-csharp
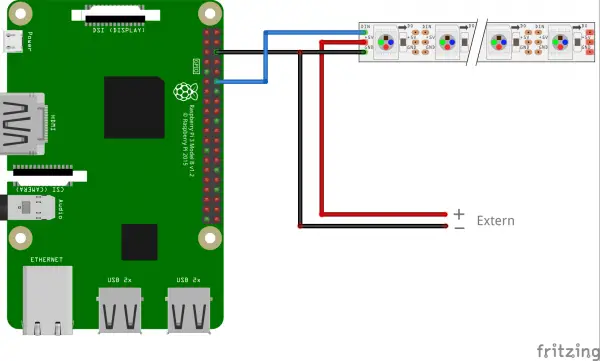
Connection between Raspberry Pi and WS2812 NeoPixel stripes
If the power supply is set up so far, we connect the Raspberry Pi to the WS2812 RGB LED strip. The (switching) power supply must first be disconnected from the power.
Since there is only one data line, we only need one pin (GPIO 18). It is important that the ground connections of the Raspberry Pi and the switching power supply are connected, but not the 5V voltages! Overall, only two cables run from the Raspberry Pi to the WS2812 LED Strip: GPIO 18 (to DIN) and GND to COM of the PSU and GND of the strip.
(from https://www.raspberrypi.org/forums/viewtopic.php?t=150254
GPIO 12/13/18/19 all have hardware PWM and are available on Pis with the 40 pin expansion header (pins 32/33/12/35). However 12/18 share a setting as do 13/19.)
(from https://www.raspberrypi.org/forums/viewtopic.php?t=150254
GPIO 12/13/18/19 all have hardware PWM and are available on Pis with the 40 pin expansion header (pins 32/33/12/35). However 12/18 share a setting as do 13/19.)
Schematic connection between Raspberry Pi, WS2812 and the external power supply
Depending on the length of the LED strip, the external power connection should be installed in several places. Ideally, the VCC and GND will be connected in parallel with the switching power supply on approximately every meter (so that many cables will lead to the power supply input).
Note: For lengths less than 1m, the power supply can also be omitted and the input voltage from the RV 5V pin of the Raspberry Pi come.
Preparation & Installation
Before we install the Raspberry Pi library for the WS2812 LEDs, some preparations have to be made:
- The package sources are updated:
sudo apt-get update - We install the required packages (confirm with Y):
sudo apt-get install gcc makebuild-essential python-dev git scons swig The audio output must be deactivated. For this we edit the filesudo nano /etc/modprobe.d/snd-blacklist.confHere we add the following line:blacklist snd_bcm2835Then the file is saved by pressing CTRL + O and CTRL + X closes the editor.We also need to edit the configuration file:sudo nano /boot/config.txtrBelow are lines with the following content (with Ctrl + W you can search):# Enable audio (loads snd_bcm2835) dtparam=audio=onThis bottom line is commented out with a hashtag # at the beginning of the line:#dtparam=audio=on- We restart the system
sudo reboot
Now we can download the library.
git clone https://github.com/jgarff/rpi_ws281x
In this directory are on the one hand some C files included, which can be easily compiled. The example code for this is easy to understand. In order to use them in Python, we need to compile them:
cd rpi_ws281x/
sudo scons
from https://github.com/jgarff/rpi_ws281x
Running:
- Type
sudo ./test(default uses PWM channel 0). - That's it. You should see a moving rainbow scroll across the display.
- More options are available,
./test -hshould show them:
./test version 1.1.0
Usage: ./test
-h (--help)    - this information
-s (--strip)   - strip type - rgb, grb, gbr, rgbw
-x (--width)   - matrix width (default 8)
-y (--height)  - matrix height (default 8)
-d (--dma)     - dma channel to use (default 10)
-g (--gpio)    - GPIO to use
                 If omitted, default is 18 (PWM0)
-i (--invert)  - invert pin output (pulse LOW)
-c (--clear)   - clear matrix on exit.
-v (--version) - version information
## Build python
cd /home/pi/rpi_ws281x/python
the build instructions in the parent directory.
When complete, you can build this python wrapper:
```
sudo apt-get install python-dev swig
python ./setup.py build
``` ç½®
If you are rebuilding after fetching some updated commits, you might need toˆ—
remove the build directory first
```
rm -rf ./build
```
## Install
If you want to install the library (in a virtualenv or in the system), so that you can `import neopixel` from anywhere, you need to run:
```
sudo python ./setup.py install
```
Depending on where you are installing, root privileges may be needed (prepend `sudo` to the install command).
## Run a demo
```
sudo PYTHONPATH=".:build/lib.linux-armv7l-2.7" python examples/strandtest.py
```
If you installed the library, there is no need to specify `PYTHONPATH`:
```
sudo python examples/strandtest.py
C#
https://github.com/rpi-ws281x/rpi-ws281x-csharp


留言
張貼留言