TM1638 Module 8 Push buttons 8 LEDS (LED & KEY)
from http://www.arduinoprojects.net/led-projects/arduino-and-a-tm1638-module.php

from https://github.com/gavinlyonsrepo/TM1638plus/blob/master/examples/TM1638plus_TEST_Model1/TM1638plus_TEST_Model1.ino
| Project Name: TM1638 |
| File: TM1638plus_TEST_Model1.ino |
| Description: demo file library for TM1638 module(LED & KEY). Model 1 |
| Carries out series of tests demonstrating arduino library TM1638plus. |
| TESTS: |
| TEST 0 Reset |
| TEST 1 Brightness |
| TEST 2 ASCII display |
| TEST 3 Set a single segment |
| TEST 4 Hex digits |
| TEST 5 Text String with Decimal point |
| TEST 6 TEXT + ASCII combo |
| TEST 7 Integer Decimal number |
| TEST 8 Text String + Float |
| TEST 9 Text String + decimal number |
| TEST 10 Multiple dots |
| TEST 11 Display Overflow |
| TEST 12 Scrolling text |
| TEST 13 setLED and setLEDs method |
| TEST 14 Buttons + LEDS |
| Author: Gavin Lyons. |
| Created May 2019 |
| URL: https://github.com/gavinlyonsrepo/TM1638plus |
| */ |
|
|
| #include <TM1638plus.h> |
|
|
| // GPIO I/O pins on the Arduino connected to strobe, clock, data, |
| //pick on any I/O you want. |
| #define STROBE_TM 4 // strobe = GPIO connected to strobe line of module |
| #define CLOCK_TM 6 // clock = GPIO connected to clock line of module |
| #define DIO_TM 7 // data = GPIO connected to data line of module |
| bool high_freq = false; //default false,, If using a high freq CPU > ~100 MHZ set to true. |
|
|
| //Constructor object (GPIO STB , GPIO CLOCK , GPIO DIO, use high freq MCU) |
| TM1638plus tm(STROBE_TM, CLOCK_TM , DIO_TM, high_freq); |
|
|
|
|
| // Some vars and defines for the tests. |
| #define myTestDelay 5000 |
| #define myTestDelay1 1000 |
| uint8_t testcount = 0; |
|
|
|
|
| void setup() |
| { |
| Serialinit(); |
| tm.displayBegin(); |
| delay(myTestDelay1); |
| |
| //Test 0 reset |
| Test0(); |
| } |
|
|
| void loop() |
| { |
| switch (testcount) |
| { |
| case 1: Test1(); break; // Brightness |
| case 2: Test2(); break; // ASCII display |
| case 3: Test3(); break; // Set a single segment |
| case 4: Test4(); break; // Hex digits |
| case 5: Test5(); break; // Text String with Decimal point |
| case 6: Test6(); break; // TEXT + ASCII combo |
| case 7: Test7(); break; // Integer Decimal number |
| case 8: Test8(); break; // Text String + Float hack |
| case 9: Test9(); break; // Text String + decimal number |
| case 10: Test10(); break; // Multiple Decimal points |
| case 11: Test11(); break; // Display Overflow |
| case 12: Test12(); break; // Scrolling text |
| case 13: Test13(); break; // setLED and setLEDs |
| case 14: Test14(); break; // Buttons + LEDS |
| } |
| testcount++; |
| } |
|
|
| void Test0() |
| { |
| // Test 0 reset test |
| tm.setLED(0, 1); |
| delay(myTestDelay); |
| tm.reset(); |
| } |
|
|
| void Test1() { |
| // Test 1 Brightness and reset |
| for (uint8_t brightness = 0; brightness < 8; brightness++) |
| { |
| tm.brightness(brightness); |
| tm.displayText("00000000"); |
| delay(myTestDelay1); |
| } |
| tm.reset(); |
| // restore default brightness |
| tm.brightness(0x02); |
| } |
|
|
| void Test2() { |
| //Test 2 ASCII , display 2.341 |
|
|
| tm.displayASCIIwDot(0, '2'); |
| tm.displayASCII(1, '3'); |
| tm.displayASCII(2, '4'); |
| tm.displayASCII(3, '1'); |
| delay(myTestDelay); |
| tm.reset(); |
| } |
|
|
| void Test3() { |
| //TEST 3 single segment (pos, (dp)gfedcba) |
| //In this case segment g (middle dash) of digit position 7 |
| tm.display7Seg(7, 0b01000000); // Displays " -" |
| delay(myTestDelay); |
| } |
|
|
| void Test4() { |
| // Test 4 Hex digits. |
| tm.displayHex(0, 1); |
| tm.displayHex(1, 2); |
| tm.displayHex(2, 3); |
| tm.displayHex(3, 4); |
| tm.displayHex(4, 5); |
| tm.displayHex(5, 6); |
| tm.displayHex(6, 7); |
| tm.displayHex(7, 8); |
| delay(myTestDelay); // display 12345678 |
|
|
| tm.displayHex(0, 8); |
| tm.displayHex(1, 9); |
| tm.displayHex(2, 10); |
| tm.displayHex(3, 11); |
| tm.displayHex(4, 12); |
| tm.displayHex(5, 13); |
| tm.displayHex(6, 14); |
| tm.displayHex(7, 15); |
| delay(myTestDelay); // display 89ABCDEF |
| } |
|
|
| void Test5() { |
| // Test 5 TEXT with dec point |
| // abcdefgh with decimal point for c and d |
| tm.displayText("abc.d.efgh"); |
| delay(myTestDelay); |
| } |
|
|
| void Test6() { |
| // Test6 TEXT + ASCII combo |
| // ADC=.2.948 |
| char text1[] = "ADC=."; |
| tm.displayText(text1); |
| tm.displayASCIIwDot(4, '2'); |
| tm.displayASCII(5, '9'); |
| tm.displayASCII(6, '4'); |
| tm.displayASCII(7, '8'); |
| delay(myTestDelay); |
| tm.reset(); |
| } |
|
|
| void Test7() { |
| // TEST 7a Integer |
| tm.displayIntNum(45, false); // "45 " |
| delay(myTestDelay); |
| // TEST 7b Integer |
| tm.displayIntNum(99991, true); // "00099991" |
| delay(myTestDelay); |
| tm.reset(); |
| // TEST 7b tm.DisplayDecNumNIbble |
| tm.DisplayDecNumNibble(1234, 5678, false); // "12345678" |
| delay(myTestDelay); |
| tm.DisplayDecNumNibble(123, 662, true); // "01230662" |
| delay(myTestDelay); |
| } |
|
|
| void Test8() { |
| // TEST 8 TEXT STRING + integer SSSSIIII |
| char workStr[11]; |
| uint16_t data = 234; |
| sprintf(workStr, "ADC=.%04d", data); // "ADC=.0234" |
| tm.displayText(workStr); |
| delay(myTestDelay); |
| } |
|
|
| void Test9() { |
| // TEST 9 Text String + Float SSSSFFFF , just one possible method. |
| float voltage = 12.45; |
| uint16_t temp = 0; |
| char workStr[11]; |
| uint8_t digit1, digit2, digit3 , digit4; |
| voltage = voltage * 100; // 1245 |
| temp = (uint16_t)voltage; |
| digit1 = (temp / 1000) % 10; |
| digit2 = (temp / 100) % 10; |
| digit3 = (temp / 10) % 10; |
| digit4 = temp % 10; |
|
|
| sprintf(workStr, "ADC=.%d%d.%d%d", digit1, digit2, digit3, digit4); |
| tm.displayText(workStr); //12.45.VOLT |
| delay(myTestDelay); |
| tm.reset(); |
| } |
|
|
| void Test10() |
| { |
| //TEST 10 Multiple dots test |
| tm.displayText("Hello..."); |
| delay(myTestDelay); |
| tm.displayText("...---..."); //SOS in morse |
| delay(myTestDelay); |
| } |
|
|
| void Test11() |
| { |
| //TEST11 user overflow |
| tm.displayText("1234567890abc"); //should display just 12345678 |
| delay(myTestDelay); |
| tm.reset(); |
| } |
|
|
|
|
| void Test12() { |
| //TEST 12 scrolling text, just one possible method. |
| char textScroll[17] = " Hello world 123"; |
| unsigned long previousMillis_display = 0; // will store last time display was updated |
| const long interval_display = 1000; // interval at which to update display (milliseconds) |
|
|
| while(1) |
| { |
| tm.displayText(textScroll); |
| unsigned long currentMillis = millis(); |
| |
| if (currentMillis - previousMillis_display >= interval_display) |
| { |
| previousMillis_display = currentMillis; |
| if (strlen(textScroll) > 0) |
| { |
| memmove(textScroll, textScroll+1, strlen(textScroll)); |
| tm.displayText(" "); //Clear display or last character will drag across screen |
| }else |
| { |
| return; |
| } |
| } |
| } |
| } |
|
|
| void Test13() |
| { |
| //Test 13 LED display |
| uint8_t LEDposition = 0; |
|
|
| // Test 13A Turn on redleds one by one, left to right, with setLED where 0 is L1 and 7 is L8 (L8 RHS of display) |
| for (LEDposition = 0; LEDposition < 8; LEDposition++) { |
| tm.setLED(LEDposition, 1); |
| delay(500); |
| tm.setLED(LEDposition, 0); |
| } |
|
|
| // TEST 13b test setLEDs function (0xLEDXX) ( L8-L1 , XX ) |
| // NOTE passed L8-L1 and on display L8 is on right hand side. i.e. 0x01 turns on L1. LXXX XXXX |
| // For model 1 just use upper byte , lower byte is is used by model3 for bi-color leds leave at 0x00 for model 1. |
| tm.setLEDs(0xFF00); // all LEDs on |
| delay(3000); |
| tm.setLEDs(0x0100); // Displays as LXXX XXXX (L1-L8) , NOTE on display L8 is on right hand side. |
| delay(3000); |
| tm.setLEDs(0xF000); // Displays as XXXX LLLL (L1-L8) , NOTE on display L8 is on right hand side. |
| delay(3000); |
| tm.setLEDs(0x0000); // all off |
| delay(3000); |
|
|
| } |
|
|
| void Test14() { |
| //Test 14 buttons and LED test, press switch number S-X to turn on LED-X, where x is 1-8. |
| //The HEx value of switch is also sent to Serial port. |
| tm.displayText("buttons "); |
| while (1) // Loop here forever |
| { |
| uint8_t buttons = tm.readButtons(); |
| /* buttons contains a byte with values of button s8s7s6s5s4s3s2s1 |
| HEX : Switch no : Binary |
| 0x01 : S1 Pressed 0000 0001 |
| 0x02 : S2 Pressed 0000 0010 |
| 0x04 : S3 Pressed 0000 0100 |
| 0x08 : S4 Pressed 0000 1000 |
| 0x10 : S5 Pressed 0001 0000 |
| 0x20 : S6 Pressed 0010 0000 |
| 0x40 : S7 Pressed 0100 0000 |
| 0x80 : S8 Pressed 1000 0000 |
| */ |
| Serial.println(buttons, HEX); |
| doLEDs(buttons); |
| tm.displayIntNum(buttons, true); |
| delay(250); |
| } |
| } |
|
|
| // scans the individual bits of value sets a LED based on which button pressed |
| void doLEDs(uint8_t value) { |
| for (uint8_t LEDposition = 0; LEDposition < 8; LEDposition++) { |
| tm.setLED(LEDposition, value & 1); |
| value = value >> 1; |
| } |
| } |
|
|
| //Function to setup serial called from setup FOR debug |
| void Serialinit() |
| { |
| Serial.begin(9600); |
| delay(100); |
| Serial.println("--Comms UP--TM1638plus_TEST_Model1.ino--"); |
| /* |
from http://arduinolearning.com/learning/basics/arduino-tm1638-module.php
The module I bought had 5 connections.
VCC – 5v from Arduino
Gnd – GND from Arduino
STB – strobe pin, an output from your Arduino
CLK – clock pin, an output from your Arduino
DIO – data pin, another ouput from your Arduino
Layout
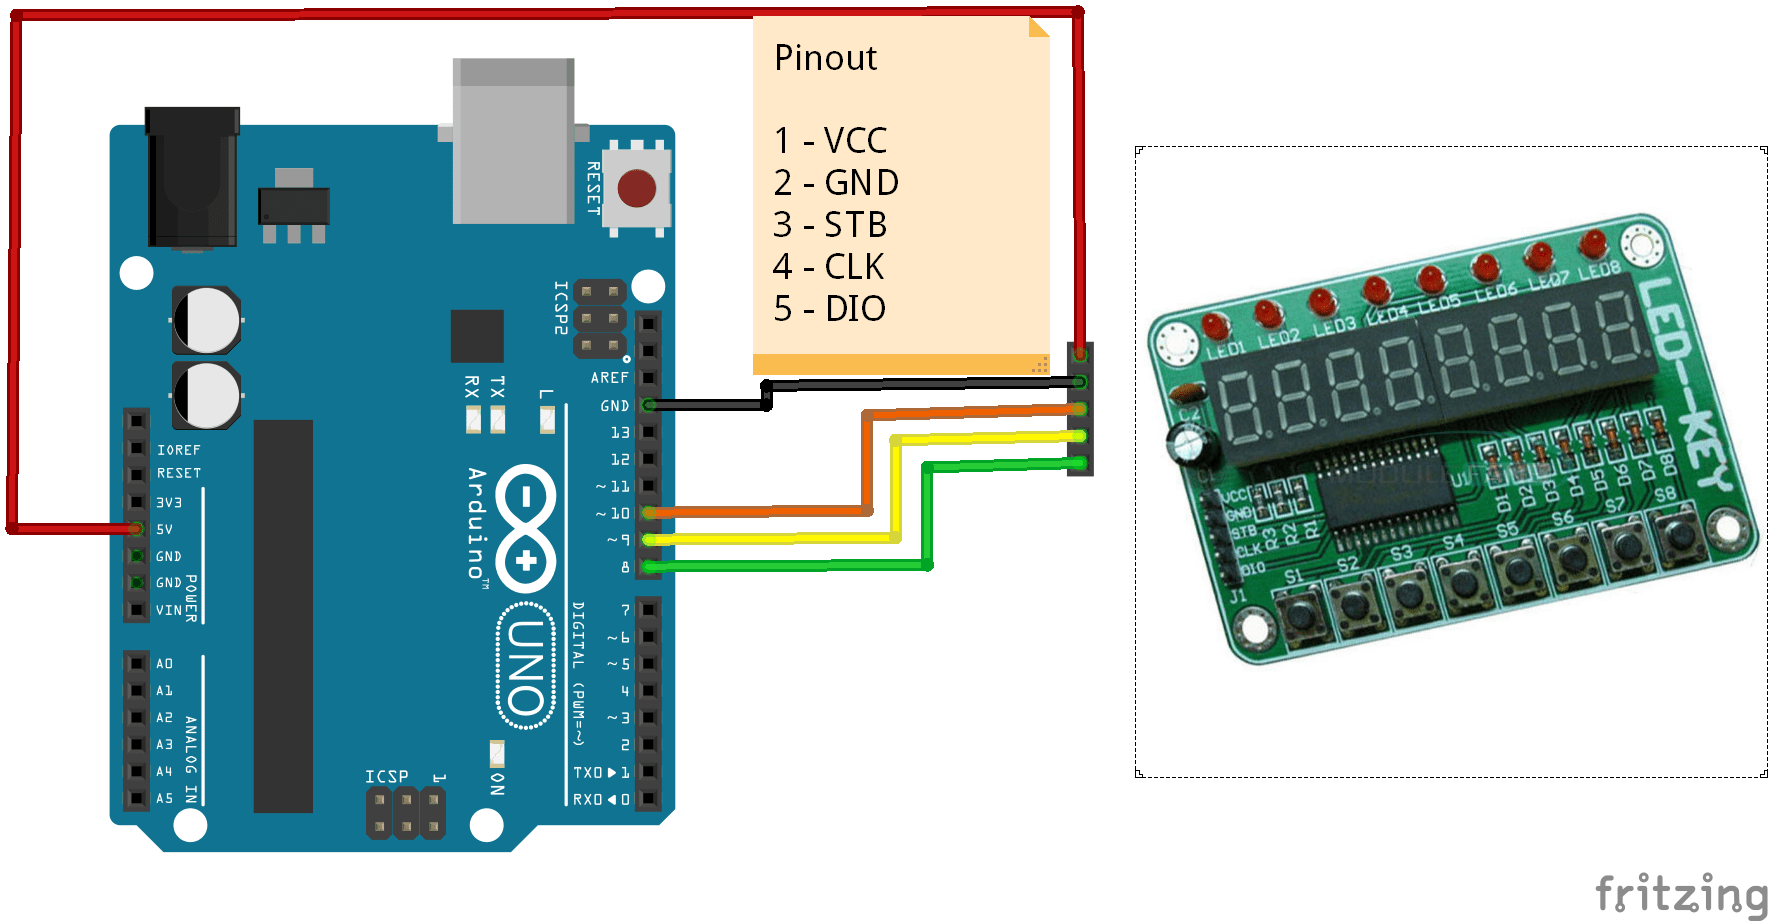
arduino and TM1638
Code
You can get a library to make development easier from https://code.google.com/p/tm1638-library/
In the example below we use a couple of functions built into the library, there are various others that are available. We will count to 100 and then display a message.
setDisplayToDecNumber – Decimal numbers will be displayed
setDisplayToString – Displays some text on the segments
1 2 3 4 5 6 7 8 9 10 11 12 13 14 15 16 17 18 19 | #include <TM1638.h>// define a module on data pin 8, clock pin 9 and strobe pin 10TM1638 module(8, 9, 10);unsigned long a=1;void setup(){}void loop(){for (a=1; a<=100; a++){module.setDisplayToDecNumber(a,0,false);delay(100);}module.setDisplayToString("Complete");delay(1000);} |


留言
張貼留言